DIY Light-up TARDIS Patch Jacket #WearableWednesday #Wearables #DoctorWho #NeoPixels https://t.co/SvDlyWO4ye— adafruit industries (@adafruit) November 21, 2018
New Things I've Tried
This blog is a place where I write about tools and ideas related to teaching, technology, and making.
Monday, November 19, 2018
DIY Light-up TARDIS Patch Jacket #wearabletech #etextile
Wednesday, November 7, 2018
Ugly Christmas Sweater 2018
 I just finished working on an ugly Christmas sweater for 2018. I started with this gem, which was a thoughtful donation from a friend. The biggest challenge I first saw with this type of sweater is that it opens up in the front, requiring some thoughtful planning to ensure there is enough power distributed from one side to the other. In order to reduce the amount of hand sewing I needed to do (and to reduce resistance), I ended up using a combination of silicone wire and conductive thread.
To get started, I ironed some fabric stiffener to the front and neck of the sweater, because I've learned the hard way that conductive thread doesn't work reliably with stretchy yarn (without a little help). My original thought was that I'd keep the Neo-Pixels and sensors confined to one side of the sweater, while sewing LEDs onto both sides.
The fabric stiffener did its job, but I ended up having to cut some of it out, because the sweater ended up looking rigid and boxy in the shoulders.
The next thing I did was work on writing the code and prototyping the circuit. This took a long time, because I wanted my sweater to have the following features:
1. Neo-Pixels triggered by a light sensor
2. Multiple songs triggered randomly
3. The ability to turn the music off and on with the press of a button
4. A light display triggered by a temperature sensor
5. A motor that did something useful (if only marginally)
 After lots of experimentation, and some judicious remixing, I have a fully functioning program! The code compiles and circuit works! While I kept the idea for the motor alive in my code, I ended up scrapping the idea.
 Of note, the LilyPad Arduino 328 Main Board doesn't have a JST socket soldered to it, so I sewed on a LilySimple Power to add an on/off switch, as well as a place to put the battery.
Based upon preliminary tests, I noticed that powering the circuit directly from the LilySimple Power was interfering with my temperature sensor. The interference didn't happen whenever the LilyPad was connected to a USB port through the FTDI cable. After a lot of experimentation with different batteries, voltages, and plugs, I determined that my problem might be that I had too many things connected to the positive (+) pin on the LilyPad. When using a LilySimple Power, which attaches to the positive pin of the LilyPad, I thought that I needed to come up with another way to send power to the temperature sensor.
While trying to figure out how to solve my problem I came across this LilyPad Temperature Sensor Example code, which explained that I needed to declare a spare analog pin as an output, set it to high, and then connect the positive (+) pin of the sensor to it. BRILLIANT!
But...even after I made those changes to the code, the temperature sensor was still reading higher than it should have whenever my LilyPad was powered via the LilySimple Power. The simple solution, which I wish I'd thought of earlier, was to modify the sensor threshold in the code itself.
 To save time, I used the cording foot on my sewing machine to attach the silicone wire used for the power and ground rails going up the center of my sweater.
Very carefully, I split the coating of the wire in places where it needed to come in contact with the NeoPixels, and I hand-sewed them to gaps in the wire.
 All of the wires and hot glue look pretty messy inside, but I'm hoping they'll be strong enough they way they are.
When I turn the power on, green and white LEDs flash in an alternating pattern. If I cover the light sensor, the NeoPixels fill with green, red, and then blue. When the temperature sensor gets triggered by warm hands (or a warm cup of coffee), red LEDs turn on and flash. If I want to hear one of four random Christmas tunes, I simply toggle a momentary push button and a piezo buzzer kicks into high gear, in sync with the lights!
To have a look at the code, visit my Wearable Electronics repository on Github.
Sunday, December 31, 2017
Laser-cut Solar Charger
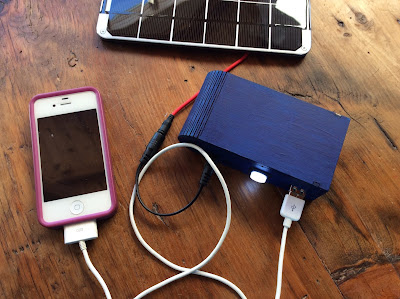
Following Becky Stern's Solar USB Charger Instructable, I just finished making my own portable solar charger! It hasn't been sunny enough to take the solar panel outside, but I've confirmed that the charger works!
Rather than using a cardboard box for the contents, I used Adobe Illustrator to make a revised version of this simple curved box with a living hinge. My revision adds holes for the components depicted below.
Completing this project has made me want to learn more about ways that I might apply solar power to future project.
Thursday, September 21, 2017
How to Make a Light-up LED Cuff with a Magnetic Switch #makered
I'm scheduled to teach an e-textiles workshop at the annual Vermont Art Teachers Association (VATA) conference on 29 September.
As part of this hands-on activity, I will be teaching some classroom-tested strategies for helping large groups of students to create their own light-up wearable cuffs, constructed with felt, conductive thread, and ring magnets.
Here is the link to my Light it Up: Fun with E-Textiles presentation.
If you are interested in learning more, I've also created a new Instructable (and accompanying video tutorial) detailing my process with students grades three through five. There, you'll find useful circuit diagrams and templates, as well as links to vital supplies.
Thursday, September 7, 2017
Spidery Sparkle Skirt
 I sewed this skirt for my daughter last year; but, in the spirit of the Champlain Maker Faire, I just transformed it into a spidery sparkle skirt, using a Flora, an accelerometer, some NeoPixels, and Becky Stern's code.
  |
| Matching pocket to support the battery |
Saturday, August 26, 2017
Laser-cut Wood & Leather Purse
 I am in the process of learning how to finish laser-cut wood and leather. I recently finished making a wooden purse for my mother, using an open source design by Scott Austin (CC BY SA).
 If you are interested in open source designs, you may want to check out Obrary.com, a fantastic repository for Creative Commons licensed designs that may be produced with a laser cutter or CNC router.

The purse design calls for 1/4" hardwood; as a novice, I started with Baltic birch. While I was excited to get the pieces cut out (especially the living hinge) I learned that I should have modified the design to ensure that the size of the tabs matched up with the exact thickness of my wood. I also discovered that it's important to pay attention to the direction of the wood grain when moving shapes around in Adobe Illustrator. Since I didn't consider these things prior to cutting out the pieces, the wood grain lacks consistency and the tab connections look sloppier than I would have liked.
After gluing the purse together and sanding the wood, I used FW Pearlescent Liquid Acrylic Ink, in Birdwing Copper, to add color to the plywood. Next time, I'll probably opt for a more traditional stain.

After washing the char off of the leather with Murphy's oil soap, and allowing it dry overnight, I painted the leather pieces with Jacquard Neopaque Acrylic Paint in turquoise. After letting them dry, I attached them using double cap steel rivets. I used E6000 to glue two leather disks to the purse, to serve as a raised button, which the ring slides over when the purse is closed.
By using turquoise and copper, I was trying to create a purse with a southwestern feel (that would match my mom's favorite pair of sandals). Next time, I'll stick to a more subdued color pallet.
Update:
My next iteration (also Baltic Birch) turned out a little nicer. The wood grain is going in the correct direction and the tabs are a better fit. I used a slightly larger version of the leather closure, which I prefer. I applied a Minwax Gel Stain to the wood and black Jacquard Neopaque Acrylic paint to the leather. Next time, I plan to use a higher quality wood.
Monday, August 21, 2017
Second Iteration: Laser Cut Book Cover
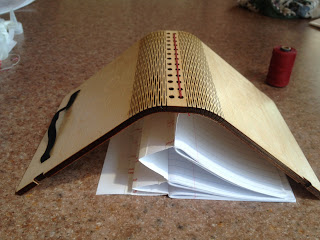
This is the second iteration of a laser cut book cover with living hinges. In my last post, I didn't add holes for a traditional binding, so I ended up screwing in a metal binder mechanism.
|
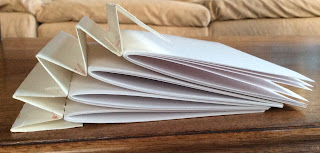
I sewed card stock signatures to the peaks of the accordion.
 |
| I sewed the left and right most creases of the hinge to the cover. |
 |
| I used red waxed linen thread to sew in the accordion hinge. I had to try this a couple of times, because the first accordion hinge that I created was too wide and too tall. |
 |
| Because there is so much room for expansion, this binding would work well for adding ephemera or pop-up structures. |

 |
| The cover can fold flat once the accordion hinge is sewn in. |
Subscribe to:
Comments (Atom)


