I just finished working on an ugly Christmas sweater for 2018. I started with this gem, which was a thoughtful donation from a friend. The biggest challenge I first saw with this type of sweater is that it opens up in the front, requiring some thoughtful planning to ensure there is enough power distributed from one side to the other. In order to reduce the amount of hand sewing I needed to do (and to reduce resistance), I ended up using a combination of silicone wire and conductive thread.
To get started, I ironed some fabric stiffener to the front and neck of the sweater, because I've learned the hard way that conductive thread doesn't work reliably with stretchy yarn (without a little help). My original thought was that I'd keep the Neo-Pixels and sensors confined to one side of the sweater, while sewing LEDs onto both sides.
The fabric stiffener did its job, but I ended up having to cut some of it out, because the sweater ended up looking rigid and boxy in the shoulders.
The next thing I did was work on writing the code and prototyping the circuit. This took a long time, because I wanted my sweater to have the following features:
1. Neo-Pixels triggered by a light sensor
2. Multiple songs triggered randomly
3. The ability to turn the music off and on with the press of a button
4. A light display triggered by a temperature sensor
5. A motor that did something useful (if only marginally)
After lots of experimentation, and some judicious remixing, I have a fully functioning program! The code compiles and circuit works! While I kept the idea for the motor alive in my code, I ended up scrapping the idea.
Next, I needed to figure out the best power supply to use. Initially, I wasn't sure whether a 3.7 V lithium polymer battery would work, since I was using power-hungry sensors and NeoPixels; a lipo cell ended up working fine.
Based upon preliminary tests, I noticed that powering the circuit directly from the LilySimple Power was interfering with my temperature sensor. The interference didn't happen whenever the LilyPad was connected to a USB port through the FTDI cable. After a lot of experimentation with different batteries, voltages, and plugs, I determined that my problem might be that I had too many things connected to the positive (+) pin on the LilyPad. When using a LilySimple Power, which attaches to the positive pin of the LilyPad, I thought that I needed to come up with another way to send power to the temperature sensor.
While trying to figure out how to solve my problem I came across this LilyPad Temperature Sensor Example code, which explained that I needed to declare a spare analog pin as an output, set it to high, and then connect the positive (+) pin of the sensor to it. BRILLIANT!
But...even after I made those changes to the code, the temperature sensor was still reading higher than it should have whenever my LilyPad was powered via the LilySimple Power. The simple solution, which I wish I'd thought of earlier, was to modify the sensor threshold in the code itself.
To save time, I used the cording foot on my sewing machine to attach the silicone wire used for the power and ground rails going up the center of my sweater.
Very carefully, I split the coating of the wire in places where it needed to come in contact with the NeoPixels, and I hand-sewed them to gaps in the wire.
All of the wires and hot glue look pretty messy inside, but I'm hoping they'll be strong enough they way they are.
When I turn the power on, green and white LEDs flash in an alternating pattern. If I cover the light sensor, the NeoPixels fill with green, red, and then blue. When the temperature sensor gets triggered by warm hands (or a warm cup of coffee), red LEDs turn on and flash. If I want to hear one of four random Christmas tunes, I simply toggle a momentary push button and a piezo buzzer kicks into high gear, in sync with the lights!
Using this tool is a MUCH easier way to code music than trying to use sheet music and a frequency chart to cobble a song together. (Ask me how I know.)
To get started, your computer needs some type of MIDI sequencing/notation software, such as Rosegarden, which is open source. From there, you'll be able to upload MIDI files and modify the names of individual tracks to correspond with the pins on your microcontroller. This demo video explains exactly how it works.
Here's a video of my Lilypad playing the Simon and Garfunkel song TheSound of Silence through a buzzer on pin 7.
I started by finding a MIDI file I wanted to use on this site.
After finding a link to Bryan Cera's Paper Electronics Workshop on the Google + 21st Century Notebooking community page, I ordered a few supplies and got started making my own paper synthesizer!
I made a few mistakes along the way, but I learned how to use my multimeter in continuity mode and how to manually designate a sketchbook location in the Arduino IDE under preferences, neither of which I've ever had to do before.
Bryan's instructions are very detailed, and he generously shares his templates, code, and supply list. So, if you are interested in using an ATtiny85 to create your own musical instrument, be sure to check out Bryan Cera's Paper Electronics Workshop!
Today, I am learning how to use an ATtiny85 to program sewable neopixels, with the goal of moving toward using surface-mounted RGB LEDs in paper circuitry. The reason that this is so exciting is because the ATtiny85 is an inexpensive, low-profile chip, making it useful for notebook hacking and art projects! If I can figure out how to make this entire process happen on a Chromebook, it would be a huge breakthrough for classroom instruction.
At the time I was working on this project, there was still one step that required the use of a PC: the process of burning a boot loader/ changing the fuse timing on the ATtiny85. To use neopixels, the ATtiny85 needs to run on an 8 Mhz internal clock, rather than the default of 1 Mhz. As of 11 January 2016, this issue has been fixed, making it incredibly easy to do this type of thing with students using Chromebooks!
Once I converted the chip to 8 Mhz, I was able to use CodeBender and a Chromebook to program it with neopixel sample code (with only a couple of small tweaks).
My next step was to see if I could apply this new learning to building a paper circuit with copper tape and surface mounted RGB LEDs. The photos demonstrate a prototype using the surface mounted RGB LEDs soldered to wire!
Since I was able to get the LEDs to do what I wanted with wire, I am 100% convinced that this can be replicated with copper tape! Stay tuned!
ATtiny85 controlling SMD RGB LEDs
Updated 19 Dec 15:
I've created my first paper circuit with neopixels! To learn more, visit BlingtheBook.blogspot.com.
My daughter recently asked me to transform a red sweater vest into an ugly Christmas sweater for a special event at her school. Using a Gemma microprocessor and four neopixels, I made one that flashes and changes colors at the push of a button. I originally used my PC to program the microprocessor, but a friend prompted me to see whether the same results could be achieved with CodeBender and a Chromebook. I'm pleased to report that the Chromebook worked like a charm. I simply connected the Gemma to the USB port, selected the buttoncycler sketch from the Adafruit Neopixel library, modified the code to match the pins on the Gemma and the number of neopixels used, and voila'. In the past, I have found the Gemma to be a little finicky when programming in the cloud, but CodeBender is constantly improving.
In the process, I learned:
1. how to program a Gemma with CodeBender (even though no ports were detected)
2. how to use a multimeter
3. the importance of using a stabilizer when sewing with conductive thread on a loosely woven material
Unfortunately, I had to learn a couple of lessons the hard way when threads in the stretchy sweater kept shorting out!
In order to increase the versatility of this sweater, I sewed the Gemma to three tiny snaps sewn to a piece of felt. When folded up, the felt supports the battery and fits into the sweater pocket. This connects to three more snaps to complete the circuit.
I sewed the neopixels to a ribbon.
Originally, I sewed the neopixels directly to the sweater. That didn't work out well, because I didn't stabilize the back of the fabric first, requiring me to have to rip out all of the stitches.
Afterward, I used what I learned from Adafruit's chameleon scarf tutorial to sew the neopixels onto a ribbon that I later sewed to the sweater using non-conductive thread.
How to Program an ATtiny85 with Codebender and a Chromebook (Using an Arduino Uno as an ISP)
Several educators have asked me about paper circuitry and expressed interest in the idea of having their students code microprocessors for notebook hacking projects. After several days of work, I've finally completed the video tutorial that I've been promising. In the process, I learned more than I expected. For example, Codebender recently changed some aspects of its set-up, making it somewhat difficult to find the option to select a programmer. I also learned that Codebender will soon be compatible with Chrome and the TinyAVR programmer from Spark Fun; it is already compatible with Firefox.
In a previous post, I started exploring the Light Blue Bean, also referred to as the Arduino Bean. I had little difficulty getting it set up on my PC, and I was excited to try to my first real project, but I made a serious miscalculation by jumping right into a project without prototyping first (something that would have been easier to do with more than one Bean). As a result, I ended up making a soldering error that caused the Bean to stop connecting to the power pin. After several hours of playing around, taking things apart, and re-soldering did not solve my problem, I suspected that I'd damaged the gadget beyond repair.
Another error that I made, when attempting to solder header pins to my Bean (an idea that I took from Lucie's post), was making an assumption that Beans work in the same way as a typical bread board. I mistakenly thought that all of the pins in column 1, for example, could be programmed in the same way as the first pin in that column. Since all of the holes in the first row of my Bean already had solder in them from my first project, I figured I'd just move down a row and start over. This did not work! Only the first pins in each column are directly programmable via Arduino or an iOS device via the Bean Loader or the Tickle app.
Success at Last:
To make a long story short, +Craig Lyndes identified and repaired my power issue and encouraged me to try prototyping again, this time moving my header pins from the second to the top row! I am happy to report that I've got my Bean working again!
Now, I am able to make LEDs blink on demand from a PC, iPad, or iPhone, and I have a working Bean to use exclusively for prototyping. Although I will need to buy an additional one for a future project, I have learned a lot from this process! Thanks +Lucie deLaBruere and Craig.
Earlier today, I posted about my progress on my first e-textile project. I am happy to report that it has now been sewn together and is working properly!
While the audio in this video sounds pretty distorted, the hat clearly plays "Rudolph the Red Nosed Reindeer."
I used a Lily Pad Simple Snap so that I could re-use and reprogram the board for other projects, without having to remove the LilyPad, itself.
Here is what my sketch looked like before I started sewing. I'll be the first to admit that I didn't spend that much time on this. I really wanted to jump right in, rather than spending a great deal of time sketching...plus, I always change my mind when I'm on the midst of creative work. The addition of a temperature sensor is featured in a later blog post.
I'm not sure that I love the pom-poms.
After going a couple of days living in a house without power, I was starting to think that I wasn't going to accomplish my goal of having one e-textile project complete for my brief presentation at the Generator this Thursday evening.
Then, I found some inspiration from seeing the gorgeous felt ornaments that Leah Joly has been making with her middle school girls...and, as luck would have it, the power was miraculously restored!
I am so happy with the way that this is turning out!
Last night, I turned a boring black hat into this near masterpiece. I spent the morning coding the music and futzing with the circuit! It works! I am so excited! If I can get this thing sewn together in time, I may have something to show after all!
Here are two aha's!
1. After connecting my project with alligator clips to ensure that the circuit works properly, I discovered that I didn't have a clip running to my + (positive pin). This confused me, because the circuit still worked perfectly. So, I attached an alligator clip to the + pin and connected the other side of the clip to the clip connecting my speaker to the LilyPad and discovered that this caused the volume of my speaker to plunge dramatically. Although I don't yet understand why this is the case, I wonder whether that might have something to do with why the speaker on Leah's "ugly sweater" isn't louder. (Update: Nope, it doesn't.)
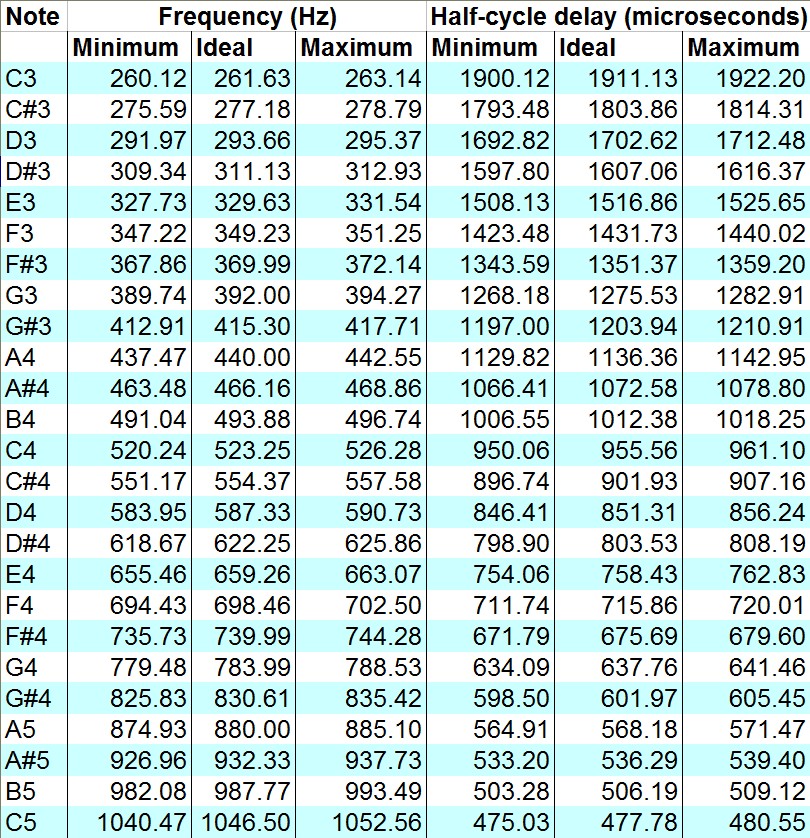
2. There are different numbers that people look at when they are coding music. Some people use the frequencies associated with musical notes, but others use a number called a "half-cycle delay." Both may be used, as long as the code consistently uses one or the other.
I spent most of my day puttering around in the basement, trying to figure out how to add a temperature sensor to the project that I've been working on.
Today marks the third official work day that I've spent, attempting to learn how to code a Lily Pad Arduino. After a great deal of trial and error, I was finally successful!
Here is a link to the code that I used. I wrote part of this code (the notes for "Baby, It's Cold Outside" and the code for the motor and sensor), but I borrowed HEAVILY from an Instructable that I found in order to get my to sync up with my music.
The video below might not look like much, but I spent nearly all day today getting my Lily Pad to sync up with flashing green and red lights!
Here is a link to the code that I used, which is a combination of the music I coded last week (see previous post) and someone else's code for the lights.
The biggest problem that I am having at the moment is that there is a long pause at the end of the song and a couple of lights are flashing for reasons I cannot figure out.
My next step is to figure out how to get the music to turn on with a temperature sensor.
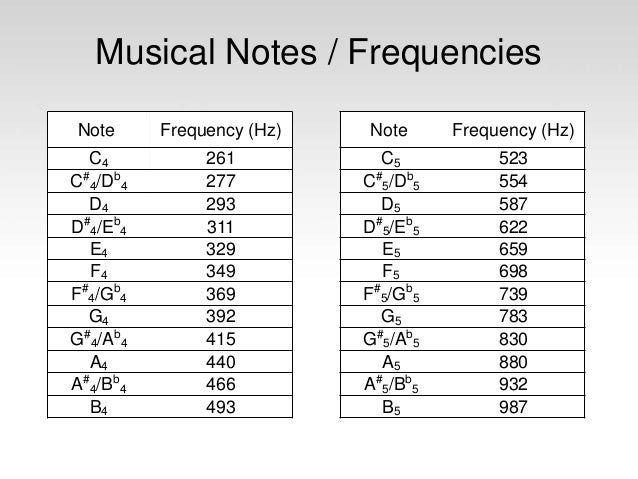
In a previous post, I shared the first musical composition that I coded for my LilyPad, a lullaby that I used to sing to my daughter. Over the weekend, I sat down and started coding the song "Baby, It's Cold Outside," to get myself in the holiday spirit! I used this frequency chart to match the notes on the sheet music. Ideally, I'd like to create a scarf that plays this song and flashes multicolored lights when the temperature dips.
I haven't yet figured out how to program lights to flash in sync with my music, but that is next on my list. Here is the code that I wrote.
The video is less than thrilling, but you can hear how my song is progressing. I would appreciate any feedback you might have.
What new learning has inspired you in your career?
"It's not the vision at all...it's the groping." (Unexpected wisdom from a Northern Exposure episode)
While working to complete the requirements for an endorsement as a Technology Integration Specialist, I've found a great deal of inspiration through the tinkering that I've been able to do as I follow passions ignited by the Maker Movement. Although I am currently between teaching jobs, I am grateful for the opportunity to be pursuing a self-designed, personalized learning plan that allows me to focus on a variety of things that captivate my interest. While I have a clear vision for the credentials I am working toward, I am pleasantly groping along a meandering path, inspired by the detours that the Maker Movement has brought my way.
Since attending the Create Make and Learn summer institute this past summer, I have been slowly learning how to code my Lilypad Arduino and Arduino Uno. Although my progress has been incremental, and my devotion has admittedly waxed and waned, it's been the grappling, and the support of others who know more about electronics than I do, that have urged me to keep plugging along. I've enjoyed participating in communities of learning, such as the one I experienced at Vermont Fest this past week.
While there, I attended an evening workshop called Practical Magic: Arduinos and Practical Computing with Bryant Patten and a small group of educators. Within that setting, I figured out ways to apply what I've been learning, whereas before I had been working in isolation, clueless about practical applications of my tooling around. For example, I learned that I can use an Arduino board to test out a circuit, before soldering the real thing together in a project. This would have been extremely useful to me a couple of weeks ago when I was attempting my first Make magazine project.
During this workshop, I also discovered that the code for one type of Arduino board can run on just about any Arduino compatible board. In other words, I finally figured out that the coding I've done on my LilyPad Arduino can run on my Arduino Uno. While my breakthroughs probably seem insignificant (and less than riveting to read about), I am curious to see just where all of this meandering leads.
What does it mean for me as an educator? Having these experiences has solidified my commitment to supporting STEAM programs within schools.
Yesterday's prompt was to reflect upon a new piece of technology that I want to try and to explain how I might use it. Although this post is a day late, I spent the afternoon teaching myself how to program a musical composition, using my LilyPad Arduino.
This summer, when I started playing around with an Arduino Uno, I didn't enjoy it nearly as much as I enjoy the LilyPad Arduino. Perhaps it's because I like the idea that I can sew the components into art projects! I'd like to learn more about programming with the LilyPad, because I want to integrate blinking lights into art projects that I'm working on. I'd like to learn how to easily move between my Arduino Uno and my LilyPad Arduino to solve problems and increase my understanding of how to write my own code.
Today, I sat down with the book, Sew Electric, and I used it to get started on programming music. As was suggested by the book, I created variables for my music notes, because they were easier to work with than the numbers assigned to different frequencies. Since I didn't want to be limited by the frequencies printed in the book, I found a lovely cheat sheet of Arduino frequencies and their corresponding notes online that helped make this easier.
Then, I played around with the tones to compose my version of Sarah McLaughlin's song, "Ice Cream," which reminds me of my daughter.
Although this is not a visually engrossing video, you can hear the song if you want to. In the near future, I will try to revise my code to match blinking lights with the song.
I know that it's been a long time since I last posted. It's not that I haven't tried any new things; it's just that I haven't made posting a priority as summer got underway.
During this last week of June, I puttered around with an Arduino board in my living room and got through many of the tutorials in the Arduino Projects Book. While it was fun to tinker around with the wires and the different components in the kit (and even more fun to see the lights blink or buzzers sound when the code was uploaded), I've concluded that I am not a natural when it comes to electronics.
This kit is advertised as being easy enough for kids, which made me feel inadequate at multiple points during the journey. With that said, I have learned that there are perhaps better kits for people like me (and kids). One platform with a variety of connectable components, similar to Legos, is called Little Bits. At some point, I'd like to compare the Little Bits experience with the Arduino experience.

 I just finished working on an ugly Christmas sweater for 2018. I started with this gem, which was a thoughtful donation from a friend. The biggest challenge I first saw with this type of sweater is that it opens up in the front, requiring some thoughtful planning to ensure there is enough power distributed from one side to the other. In order to reduce the amount of hand sewing I needed to do (and to reduce resistance), I ended up using a combination of silicone wire and conductive thread.
 After lots of experimentation, and some judicious remixing, I have a fully functioning program! The code compiles and circuit works! While I kept the idea for the motor alive in my code, I ended up scrapping the idea.
 To save time, I used the cording foot on my sewing machine to attach the silicone wire used for the power and ground rails going up the center of my sweater.
 All of the wires and hot glue look pretty messy inside, but I'm hoping they'll be strong enough they way they are.


 My next step was to see if I could apply this new learning to building a paper circuit with copper tape and surface mounted RGB LEDs. The photos demonstrate a prototype using the surface mounted RGB LEDs soldered to wire!

 My daughter recently asked me to transform a red sweater vest into an ugly Christmas sweater for a special event at her school. Using a Gemma microprocessor and four neopixels, I made one that flashes and changes colors at the push of a button. I originally used my PC to program the microprocessor, but a friend prompted me to see whether the same results could be achieved with CodeBender and a Chromebook. I'm pleased to report that the Chromebook worked like a charm. I simply connected the Gemma to the USB port, selected the buttoncycler sketch from the Adafruit Neopixel library, modified the code to match the pins on the Gemma and the number of neopixels used, and voila'. In the past, I have found the Gemma to be a little finicky when programming in the cloud, but CodeBender is constantly improving.
 In the process, I learned:


 I used a Lily Pad Simple Snap so that I could re-use and reprogram the board for other projects, without having to remove the LilyPad, itself.