Saturday, August 26, 2017

Laser-cut Wood & Leather Purse

I am in the process of learning how to finish laser-cut wood and leather.  I recently finished making a wooden purse for my mother, using an open source design by Scott Austin (CC BY SA).

If you are interested in open source designs, you may want to check out Obrary.com, a fantastic repository for Creative Commons licensed designs that may be produced with a laser cutter or CNC router.


The purse design calls for 1/4" hardwood; as a novice, I started with Baltic birch. While I was excited to get the pieces cut out (especially the living hinge) I learned that I should have modified the design to ensure that the size of the tabs matched up with the exact thickness of my wood.  I also discovered that it's important to pay attention to the direction of the wood grain when moving shapes around in Adobe Illustrator.  Since I didn't consider these things prior to cutting out the pieces, the wood grain lacks consistency and the tab connections look sloppier than I would have liked.

After gluing the purse together and sanding the wood, I used FW Pearlescent Liquid Acrylic Ink, in Birdwing Copper, to add color to the plywood.  Next time, I'll probably opt for a more traditional stain.


While the original purse design had holes for adding hardware and a handle, I had to come up with my own method for creating them.  Rather than ordering something online, I designed a closure and a handle in Inkscape and cut them out with a laser cutter.

After washing the char off of the leather with Murphy's oil soap, and allowing it dry overnight, I painted the leather pieces with Jacquard Neopaque Acrylic Paint in turquoise. After letting them dry, I attached them using double cap steel rivets.  I used E6000 to glue two leather disks to the purse, to serve as a raised button, which the ring slides over when the purse is closed.


By using turquoise and copper, I was trying to create a purse with a southwestern feel (that would match my mom's favorite pair of sandals).  Next time, I'll stick to a more subdued color pallet.

Update:

My next iteration (also Baltic Birch) turned out a little nicer.  The wood grain  is going in the correct direction and the tabs are a better fit.  I used a slightly larger version of the leather closure, which I prefer.  I applied a Minwax Gel Stain to the wood and black Jacquard Neopaque Acrylic paint to the leather.  Next time, I plan to use a higher quality wood.


Monday, August 21, 2017

Second Iteration: Laser Cut Book Cover

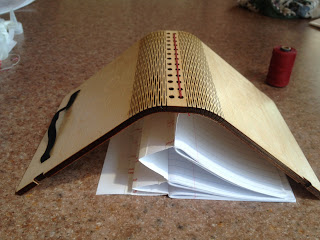
This is the second iteration of a laser cut book cover with living hinges.  In my last post, I didn't add holes for a traditional binding, so I ended up screwing in a metal binder mechanism. 

In this latest iteration, I reduced the overall width of the spine and added a flat section with holes for sewing in paper signatures. While the cover remains bulky (it's about 2 inches thick), I made the overall footprint of the book smaller, and added a box around my name.
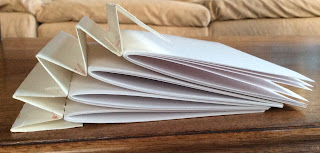
For the spine, I folded a piece of watercolor paper into an
accordion hinge; I reinforced this with double-stick tape and Tyvek from an
old postal envelope.  Since I only had two rows of holes to sew onto, 
I needed to come up with a flexible binding that could expand.
I sewed card stock signatures to the peaks of the accordion.


I sewed the left and right most creases of the hinge to the cover.

I used red waxed linen thread to sew in the accordion hinge.
I had to try this a couple of times, because the first accordion
hinge that I created was too wide and too tall.
Because there is so much room for expansion,
this binding would work well for adding ephemera or
pop-up structures.


I had to trim the height of the signatures so they didn't interfere with the
elastic closure.  In a future iteration, I would paint the watercolor
paper used for the accordion hinge; white is pretty boring.


The cover can fold flat once the accordion hinge is sewn in.


Saturday, August 12, 2017

My First Original Laser Cut Book Cover

This week at the Burlington Generator, I finally figured out how to use Inkscape's living hinge extension to create a laser cut book cover/ photo album.

+Sarah Sutter taught me how to personalize a font by turning text into editable paths. Using what I learned from her during Create Make Learn 2017, I was able to change the spacing and angles of my letters.  I really like the way they turned out.

+Jean Cherouny graciously helped me figure out how to make some improvements in Adobe Illustrator, teaching me how to use the "shift" key to select and edit individual components.  As a result, I was able to change the line widths on all of my circles, to add a little complexity to my design.


Cut from .25" Baltic Birch plywood, the cover (when folded) is 7" X 7" X 2.5".  It's a bit on the bulky side.

After sanding the plywood, I used a clear layer of polyurethane to add a little shine.


I used my sewing machine to secure the edges of the elastic closure.


+April Hallock came up with the idea of adding a metal binder mechanism to the cover.  I ended up harvesting one from an old photo album that I found in a box marked "Free" at the Williston Re-Store.


Right now the 2-ring binder mechanism is attached with nuts and bolts.  While I don't love the way that the bolts look on the back side of the cover (partially due to my lopsided drilling), I'm not yet sure how to add recesses for the bolts; that's something I'm hoping to learn.


Next time, I want to make a book with a smaller, thinner cover and a narrower spine.  In a revised iteration, I plan to add a flat spine with holes for a binding, sandwiched between two living hinges.

Tuesday, August 1, 2017

Laser-Cut Bent Acrylic

I am learning how to design in Inkscape and Adobe Illustrator at the Create Make Learn summer institute!  Today, I made this acrylic iPad/ business card stand using a laser cutter and plexiglass bender!