Saturday, April 30, 2016

Raspberry Pi Robot

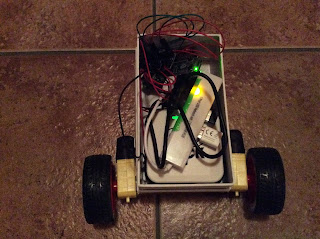
I recently started learning about Raspberry Pi. One thing I'm really excited about is the CamJam EduKit #3 Robotics kit, available through the Pi Hut. In the process of experimenting with this kit, I've started learning basic programming in Python, and I'm starting to understand how the GPIO pins work.  In addition to coming with two motors and some wheels, the kit comes with a line sensor and an ultrasonic sensor to help your robot avoid obstacles. Support worksheets for the kit are pretty easy to follow and encourage experimentation.


Pi Zero Robot


In  one breakthrough, I learned how to talk to my Pi using another computer via Secure Shell (SSH). Now, my Pi doesn't have to be tethered to a monitor, which is useful for building things that move.

While most of the code written for the CamJam EduKit #3 works the same way with a Pi Zero as as a Pi 3, the ultrasonic sensor appears to be an exception.  I don't yet understand why, but I've confirmed this to be the case.


Pi Zero Robot Innards

Thursday, April 28, 2016

Diving Deeper into Raspberry Pi

After a lot of trial and error, my Raspberry Pi 3 and Pi Zero are both up and running on wifi.  The biggest obstacle ended up being that our router was using a WEP key instead of a WAP key. While I don't fully understand how these differ, the router was the root of my difficulty.  I originally attempted to change the pi's configuration with code, but I was unsuccessful.

After changing a setting on the router itself (from WEP to WAP), writing a clean image of Raspian (via NOOBS), followed by running updates (via Ethernet), was enough to work on my Pi3.


I used the following updates:

sudo apt-get update
sudo apt-get upgrade -y
sudo apt-get dist-upgrade -y
sudo rpi-update

Afterwards, I rebooted the Pi, took out the Ethnernet cable, and re-typed my wifi key.

While I wasn't able to directly replicate these results using the Pi Zero on its own, moving the SD card from my Pi3 to the Pi Zero did the trick.

Being new to Raspberry Pi, I'm excited that I've gotten this far.  It's challenging to wade through all of the information available online, because so much of it is outdated or too complex.

At this point, I know enough to be dangerous.

For example, I can use sample code to make a Pimoroni Scroll Phat blink.


Friday, April 22, 2016

E-textile Fun: Sound Reactive Hat

Flora Sound Reactive Hat

I just put the finishing touches on a sound reactive hat that uses a Flora, a tiny microphone, and surface mountable RGB LEDs. This project is an adaptation of Lina Wassong's Sound Reactive Equalizer Skirt, shared on Instructables under a Creative Commons (CC BY NC SA) license. This is a perfect party hat.


Lessons Learned:

1.  I love Adafruit silicone stranded-core wire!
2.  Soldering RBG LEDs is tedious.
3.  A glue gun is a great tool for strengthening solder joints and diffusing light.
4.  Hand held rivet pliers may be harder to work with than standard spot setters.

I used a leather punch and a hand rivet fastener.

The Flora and a microphone are hidden inside the hat.

I went a little crazy with the glue gun!