Over the past couple of days, there has been a lot of news circulating about security issues present in gadgets connected to the Internet of Things. Keeping that in mind, I'm cautiously continuing my experimentation with the Photon, trying to be mindful of the fact that there are privacy risks involved in transforming ordinary objects into smart objects.
Thinking about ways that music might contribute to the creation of an interactive book that I'm going to be creating, I started tinkering with the code from Spark Fun's Music Time tutorial that plays Rick Astley's song "Never Going to Give You Up." I tweaked the code by creating a new Particle function that only plays the music when the function is triggered by a web call. I used the Maker Channel on If Then Than That to trigger it and linked it to a QR code (see previous post).
Even though electronic buzzer music can be a little annoying, I'm thinking that it would be interesting if QR codes embedded into a book could trigger different tunes or sound effects to help advance a narrative.
In my last post, I got a servo running on a Photon by using web requests sent from Node.js and Twitter. After getting to that point, I wondered how I might automate the process so that someone else could trigger my servo, if I were to integrate one into a wifi-connected book. Today, I had an idea that this might be achieved by creating a QR code. I wasn't sure whether this was possible until I came across a blog by Trevor Fox. While his post was related to a completely different (albeit clever) use of the QR code, I noticed that he was using If Then Than That (IFTTT) like I was, when I created my web request for Twitter. This prompted me to do some experimenting which ended up working!
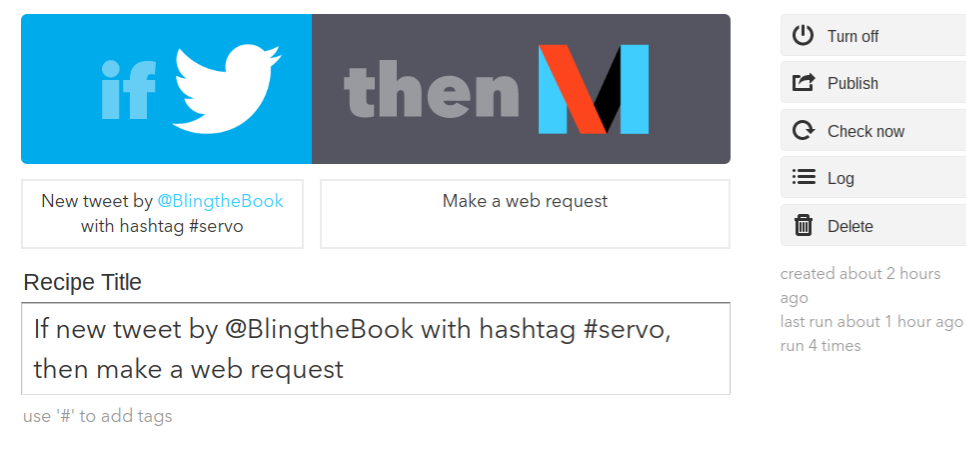
The last time I played with my servo, I created a recipe that paired Twitter with an "Action" on the Maker Channel. The "Action" was a web POST. When paired with the hashtag #servo, it triggered a Particle function that made the servo move. This time, I needed to create a "Trigger" to receive a web request.
The "Trigger" became a unique URL that I could then paste into a QR code generator to produce a QR code.
After making a new recipe on IFTTT that used the "Trigger" to call the "Action," I was able to control the servo by scanning the QR code.
I'm continuing my exploration of the Photon today and am happy to report a couple new things that I've learned. My initial goal was to get a servo up and running and to control it via Twitter.
Thanks to some open source code from MIT, shared on the Spark Fun website, I was able to get my servo to run at an established time and date, which is pretty cool! The code that I'm using was designed to have a servo tip fish food into a tank at a certain point in time, but an additional Particle function in the code also allows the servo to be moved via a web request.
Wiskers is the name of my device. Feed is the name of the Particle function.
Although I was able to quickly get the servo to work by calling the function in the command line that I set up using Node.js, creating the web request was a little trickier. In order to call the function on If Then Then That (IFTTT), I had to provide the device ID and authentication code for my Photon, as well as a unique URL linking to Particle. This took a while to figure out, but it's working now. I just have to remember to refresh my recipe in ITFFF whenever I change the code in the Particle app.
In any case, I am trying to imagine how I might embed a tiny servo into a book to help advance a narrative. It would have to be smaller than the one I'm using now. Off the top of my head, I can imagine a servo powering a tiny propeller in a steampunk book. Now, I need to figure out a way to allow the servo to be triggered by someone other than me. I'm not yet sure how to automate that, but I'll keep taking baby steps until I figure it out.
I've been continuing to play around with my Photon, as well as trying to better understand how posts, calls, and web hooks work. After spending a couple of weeks studying and experimenting with other people's code, I've learned how to create and call my own Particle functions! This means that I'm now able to control the colors of neopixels on my Photon in a variety of ways, using HTTP web requests. This is similar to the way CheerLights works (see related blog), only my posts are limited to controlling LEDs (or a buzzer) on my device. I can do this by typing my post information into the RESTED add-on for Firefox; I can do it through Twitter, by creating a recipe on If This Then That (IFTTT); I also figured out how to use curl (in the command line of my PC) , allowing me to test the HTML code that gets routed to my Photon. Getting to this point has not been at all intuitive, so I'm pretty excited I've gotten this far!
Once I figured out how to use posts to control the behavior of LEDs (outputs), it occurred to me that I still didn't know how to use a Photon to read the value of sensor data (inputs). After many failed experiments, blindly attempting to alternate between digital and analog pins to figure out how they worked, I bought an ebook titled Programming the Photon: Getting Started with the Internet of Things and started reading it. In the process, I figured out why a web hook I’d created (linking my Photon to a channel on ThingSpeak) was returning nonsense data. That data was “float” data, which is generated when a microcontroller’s analog pin (in this case A0) isn’t actually attached to a sensor. The book gave me the idea to connect a photocell and resistor to my Photon. In the process, I discovered that the web hook actually did work, and I was actually able to get data from my device to populate a chart on a Thing Speak channel I created for this purpose!
My next step is to figure out how to make this data more meaningful, and how I might use it (or some other type of data from my device) to talk with a wearable or book that I make. I also need to figure out how to use some of the other features of Thing Speak, because I don't yet understand how to use MATLAB code or apply most of the Thing Speak apps.
Taking inspiration from Jie Qi and Natalie Freed, I am embarking upon a quest to create a wifi connected book of my own. While I'm only at the start of my inquiry, I've already got a few ideas swirling.
Photon Unboxing
After reading details about Natalie Freed's Tide Notebook at NEXMAP, I discovered that she used the SparkCore microcontroller to connect her book to the web. In particular, she accessed tide data and used it to control LEDs mounted inside. The newest iteration of SparkCore, the Particle Photon microcontroller, can also send or receive data through Particle Build. Paired with a free open-source Internet of Things (IoT) platform called ThingSpeak, anyone can access or share data and use it to control physical objects, such as the LEDs in a book, wearable, or other type of physical object...even without an MIT degree!
Hello World!
My Remembrall
One enticing project that uses a Photon, in combination with several cloud-based apps, is the Internet Connected Remembrall, a physical orb that glows red when its owner neglects something on their to-do list.
By following the directions and really thinking about what each app was communicating with the other, I began to slowly understand how the Internet of Things (IoT) works on a small scale.
Once I got my own Photon connected to the Internet, I was able to start taking the code apart and changing it. I literally squealed when my LED, connected to a hashtag on Twitter, turned on for the first time! I've started learning a bit about the role of Web Hooks and JSON (Java Script Object Notation), both of which are aspects of connecting physical objects with data. Thanks to the excellent documentation in the Remembrall Instructable, I now have a road map for making my first wifi connected object tied to the data I choose.
Another thing that I've been playing with is creating an object connected via Particle Build to ThingSpeak's CheerLights channel. In case you haven't heard of CheerLights yet (I just did), data, generated through people's tweets around the world, can be harnessed to control the color of LEDs in your own physical objects. For example, if I send a tweet to @CheerLights and request a specific color, a Web Hook triggered by the Twitter feed will signal a change in the LED color on all of the objects connected to the data feed, including my own.
If I connect my own object to the data (in this case, a Photon with a Spark Fun Wearable Shield attached to a neopixel), I can see the light color change in near real time!
I recently started experimenting with needle and wet felting after a generous friend gave me some of her beloved wool stash!
While I've been dabbling with etextiles for about three years, my interest in wool as a medium was piqued by Barbara Liedahl's Ultimate Felt Bracelet with LEDs Instructable (CC BY NC). A fresh take on an old idea, Liedahl's detailed tutorial inspired me to set aside the craft store felt to make something unique.
My first pieces of felt were fun to make, even if they were a tad on the bulky side.
Needle felting propelled me into a meditative state almost immediately!
While I was happy that I'd used slow flashing 5mm RGB LEDs to add visual interest, I thought my sewing along the edges looked a bit sloppy.
In the second iteration, I added a snap switch and substituted machine stitching along the edges.
Circuit details of the snap switch are depicted below, although I used different LEDs for this project.
Thank you, Barbara Liedahl!
Here are a few more bracelets I've made for friends, including one that incorporates an Attiny85 (bottom).
Using this tool is a MUCH easier way to code music than trying to use sheet music and a frequency chart to cobble a song together. (Ask me how I know.)
To get started, your computer needs some type of MIDI sequencing/notation software, such as Rosegarden, which is open source. From there, you'll be able to upload MIDI files and modify the names of individual tracks to correspond with the pins on your microcontroller. This demo video explains exactly how it works.
Here's a video of my Lilypad playing the Simon and Garfunkel song TheSound of Silence through a buzzer on pin 7.
I started by finding a MIDI file I wanted to use on this site.